# MIT6.s081-2020 Lab1 Xv6 and Unix utilities
# 安装
我用的腾讯云的ubuntu20.4,按照官方指南“Installing via APT (Debian/Ubuntu)”一节安装较为流畅
如果是16和18会在apt install的时候容易找不到package,并且执意更改源容易存在不可未知的错误,所以在此建议直接使用ubuntu20.4或安装docker。
需要补充的是安装完了之后还要apt install riscv64-unknown-elf-gcc
官方指南文档的安装部分 (opens new window)
# Lab Xv6 and Unix utilities
做这个Lab之前首先应该先通读一下xv6-book的charpter1
$ git clone git://g.csail.mit.edu/xv6-labs-2020
Cloning into 'xv6-labs-2020'...
...
$ cd xv6-labs-2020
$ git checkout util
Branch 'util' set up to track remote branch 'util' from 'origin'.
Switched to a new branch 'util'
2
3
4
5
6
7
然后每次写完一个部分在项目目录先make clean再make qemu就能跑起来了。
# sleep
这里就是帮你熟悉一下怎么开始在6.s081里写程序,熟悉的过程可能比较曲折,调用sleep()系统调用就好。
# 引言
实现 UNIX 程序sleep对于 xv6;你的sleep应该暂停用户指定的 ticks。ticks是 xv6 内核定义的时间概念,即来自计时器芯片的两次中断之间的时间。您的解决方案应该在文件中 user/sleep.c.
# 实现
#include "kernel/types.h"
#include "kernel/stat.h"
#include "user/user.h"
int main(int argc, char *argv[]) {
  int time;
  if (argc <= 1) {
    fprintf(2, "sleep: need one arg for sleep time");
    exit(1);
  }
  time = atoi(argv[1]);
  sleep(time);
  exit(0);
}
2
3
4
5
6
7
8
9
10
11
12
13
# pingpong
# 引言
编写一个程序,使用 UNIX 系统调用通过一对管道在两个进程之间“乒乓”一个字节,一个管道用于每个方向。父母应该向孩子发送一个字节;子进程应该打印“pid: received ping”,其中pid是它的进程 ID,将管道上的字节写入父进程,然后退出;父母应该从孩子那里读取字节,打印“pid: received pong”,然后退出。您的解决方案应该在文件中user/pingpong.c.
# 实现
根据文档提供的HINT,我们可以知道大致的实现流程如下:
- 利用
pipe创建管道。 - 利用
fork创造一个孩子。 - 利用
read从管道中读取,并且write写入管道。 - 利用
getpid查找调用进程的进程ID。 - 将程序添加到
UPROGS在生成文件中。 - xv6 上的用户程序有一组有限的库函数可供他们使用。您可以在中查看列表
user/user.h; 源(系统调用除外)在user/ulib.c,user/printf.c, 和user/umalloc.c.
#include "kernel/types.h"
#include "kernel/stat.h"
#include "user/user.h"
//0 - read 1 - write
int
main(int argc, char *argv[])
{
  int p1[2], p2[2];
  int ppid, cpid;
  char buf[1];
  pipe(p1);
  pipe(p2);
  //child
  if(fork() == 0){
    //start
    close(p1[1]);
    close(p2[0]);
    cpid = getpid();
    read(p1[0], buf, 1);
    fprintf(1,"%d: received ping\n",cpid);
    write(p2[1],"x",1);
    //finished
    close(p1[0]);
    close(p2[1]);
  }else {
    close(p1[0]);
    close(p2[1]);
    ppid = getpid();
    write(p1[1],"x",1);
    read(p2[0],buf,1);
    fprintf(1,"%d: received pong\n",ppid);
    close(p1[1]);
    close(p2[0]);
  }
  exit(0);
}
2
3
4
5
6
7
8
9
10
11
12
13
14
15
16
17
18
19
20
21
22
23
24
25
26
27
28
29
30
31
32
33
34
35
36
37
38
39
40
41
42
43
44
45
# prime
# 引言
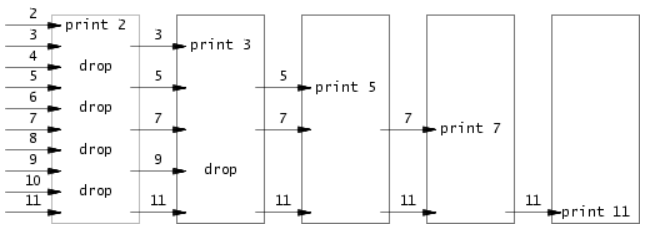
使用管道编写一个并发版本的初筛。这个想法归功于 Unix 管道的发明者 Doug McIlroy。本页 (opens new window)中间的图片和周围的文字说明了如何做到这一点。最重要的部分在于伪代码和图。
您的解决方案应该在文件中user/primes.c.
p = get a number from left neighbor
print p
loop:
    n = get a number from left neighbor
    if (p does not divide n)
        send n to right neighbor
2
3
4
5
6

# 实现
一开始没想到用递归,因为不知道进程在递归调用间切换会发生什么。这种不知道要用多少个if的东西让我陷入了僵局。exit()是结束当前进程,wait()是等待子进程结束后才向下执行。
#include "kernel/types.h"
#include "kernel/stat.h"
#include "user/user.h"
void create_child_process();
//0 - read 1 - write
int
main(int argc, char *argv[])
{
  int p1[2];
  pipe(p1);
  if(fork() != 0){
    close(p1[0]);
    for(int i = 2; i <= 35; i++){
    	write(p1[1], &i, sizeof(int));
    }
    close(p1[1]);
    wait(0);
  }else{
    create_child_process(p1);
  }
  exit(0);
}
void create_child_process(int p[]){
  int cp[2];
  int x,y;
  close(p[1]);
  if(read(p[0],&x,sizeof(int))){
    fprintf(1, "prime %d\n", x);
    pipe(cp);
    if(fork() != 0){
      close(cp[0]);
      while(read(p[0],&y,sizeof(int))){
        if(y%x != 0){
	  write(cp[1], &y, sizeof(int));
	}
     }
	 close(p[0]);
	 close(cp[1]);
	 wait(0);
    }else{
     create_child_process(cp);
   }
  }
   exit(0);
}
2
3
4
5
6
7
8
9
10
11
12
13
14
15
16
17
18
19
20
21
22
23
24
25
26
27
28
29
30
31
32
33
34
35
36
37
38
39
40
41
42
43
44
45
46
47
48
49
50
51
52
# find
# 引言
编写一个简单版本的 UNIX 查找程序:查找目录树中具有特定名称的所有文件。您的解决方案应该在文件中user/find.c。
# 实现
根据文档中提供的HINT,我们可以了解到如下内容:
- 查看
user/ls.c以了解如何读取目录。 - 使用递归允许
find下降到子目录。 - 不要递归到“.” 和 ”..”。
- 请注意, == 不会像 Python 中那样比较字符串。请改用 strcmp()。
- 将程序添加到
UPROGS在生成文件中。
在 user/ls.c 可以看出目录文件的内容就是一堆dirent,可以在kernel/fs.h中查看dirent的属性,即dirent的就是文件大小+文件名。
struct dirent {
  ushort inum;
  char name[DIRSIZ];
};
2
3
4
另外,需要注意的是:strcmp()相等的时候返回的是0,不相等的时候返回的是0以外的数
#include "kernel/types.h"
#include "kernel/stat.h"
#include "user/user.h"
#include "kernel/fs.h"
char*
getfilename(char *path)
{
  char *p;
  // Find first character after last slash.
  for(p=path+strlen(path); p >= path && *p != '/'; p--)
    ;
  p++;
  return p;
}
void
find(char *path, char *target)
{
  char buf[512], *p;
  int fd;
  struct dirent de;
  struct stat st;
  if((fd = open(path, 0)) < 0){
    fprintf(2, "find: cannot open %s\n", path);
    return;
  }
  if(fstat(fd, &st) < 0){
    fprintf(2, "find: cannot stat %s\n", path);
    close(fd);
    return;
  }
  switch(st.type){
  case T_FILE:
    if(strcmp(getfilename(path), target) == 0){
      printf("%s\n", path);
    }
    break;
  case T_DIR:
    if(strlen(path) + 1 + DIRSIZ + 1 > sizeof buf){
      printf("find: path too long\n");
    }
    strcpy(buf, path);
    p = buf+strlen(buf);
    *p++ = '/';
    while(read(fd, &de, sizeof(de)) == sizeof(de)){
      if(de.inum == 0)
        continue;
       if (strcmp(de.name, ".") == 0 || strcmp(de.name, "..") == 0) { // 跳过子目录的.和..
        continue;
      }
      memmove(p, de.name, DIRSIZ);
      p[DIRSIZ] = 0;
      if(stat(buf, &st) < 0){
        printf("find: cannot stat %s\n", buf);
        continue;
      }
      find(buf,target);
    }
    break;
  }
  close(fd);
}
int
main(int argc, char *argv[])
{
  if(argc < 3){
    fprintf(2,"find: need 2 args\n");
    exit(1);
  }
  find(argv[1],argv[2]);
  exit(0);
}
2
3
4
5
6
7
8
9
10
11
12
13
14
15
16
17
18
19
20
21
22
23
24
25
26
27
28
29
30
31
32
33
34
35
36
37
38
39
40
41
42
43
44
45
46
47
48
49
50
51
52
53
54
55
56
57
58
59
60
61
62
63
64
65
66
67
68
69
70
71
72
73
74
75
76
77
78
79
80
81
82
83
# xargs
# 引言
编写一个简单版本的 UNIX xargs 程序:从标准输入读取行并为每一行运行一个命令,将该行作为参数提供给命令。您的解决方案应该在文件中user/xargs.c.
# 实现
一开始有点不知所以然,根据文档提供的提示,了解到:
- 利用
fork和exec在输入的每一行上调用命令。利用wait在父进程中等待子进程完成命令。 - 要读取单行输入,请一次读取一个字符,直到出现换行符 ('\n')。
- kernel/param.h 声明了 MAXARG,如果您需要声明 argv 数组,这可能很有用。
结合案例,其需求是对于每一指令,在其argv数组头中添加参数。例如案例echo hello too | xargs echo bye。
因为echo hello too,所以stanard input就是"hello too",把"hello too"作为echo bye的第二个参数(第一个是bye)
#include "kernel/types.h"
#include "kernel/stat.h"
#include "user/user.h"
#include "kernel/param.h"
int
main(int argc, char *argv[])
{
  int buf_idx, read_len; // read_len is used to check if end
  char buf[512];
  char* exe_argv[MAXARG];
  for(int i = 1; i < argc; i++){
    exe_argv[i - 1] = argv[i];
  }
  while(1) {
    buf_idx = -1;
    do{
       buf_idx++;
       read_len = read(0, &buf[buf_idx], sizeof(char));
     }while(read_len > 0 && buf[buf_idx] != '\n');
      if(read_len == 0 &&buf_idx == 0){
        break;
      }
    buf[buf_idx] = '\0';
    exe_argv[argc - 1] = buf;
    if(fork() == 0){
      exec(exe_argv[0], exe_argv);
      exit(0);
    }else{
      wait(0);
    }
  }
  exit(0);
}
2
3
4
5
6
7
8
9
10
11
12
13
14
15
16
17
18
19
20
21
22
23
24
25
26
27
28
29
30
31
32
33
34
35
36
37
38
39
之所以能用到这个命令,关键是由于很多命令不支持|管道来传递参数,而日常工作中有有这个必要,所以就有了 xargs 命令
# 总结
总的来说,lab 1总体上难度不大,其涉及的内容都在和用户的一些调用以及shell打交道。
之前根本没用过fork(), read(), write(), pipe()这些函数,然后在编写过程中自己对这些linux函数的理解又更深了一些。